Connect to S3
Check out the companion Hex project for this tutorial here!
You may be working in a Hex project and finding yourself wanting to take advantage of your Amazon S3 bucket. If you’d like to set up a connection between Hex and an S3 bucket, you can use this tutorial to learn how to:
- Save a file to S3
- Read a file from S3
Create Secrets for your AWS credentials
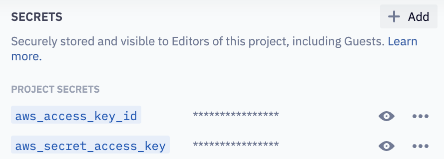
As a first step, create Secrets for two AWS credentials: AWS_ACCESS_KEY_ID and AWS_SECRET_ACCESS_KEY.
To create the Secrets, navigate to the Variables tab and hit the + Add button. In this example, the Secrets are named aws_access_key_id and aws_secret_access_key.
Set environment variables using Secret values
First, import the packages required to read + write to S3:
import boto3
import json
import sys,os
import s3fs
The most notable packages here are boto3, Amazon’s SDK, and s3fs, a FUSE-based file system backed by Amazon S3.
Next, set environmental variables using the Secret values we defined in the initial step:
os.environ['AWS_ACCESS_KEY_ID']= aws_access_key_id
os.environ['AWS_SECRET_ACCESS_KEY'] = aws_secret_access_key
Save a file to S3
In this example, we'll make some API calls and then save the resulting dataframe to an S3 bucket.
We're using the ProPublica's Congress API, which retrieves Congress's voting history of a given month. The API key that's being used, as well as the S3 bucket name, have been saved as Secrets.
Here's an example function - remember, s3_bucket_name and propublica_api_key are Secrets saved in the Hex project:
def years_data (year = 2020, s3_bucket_name = '', propublica_api_key = ''):
    months = np.arange(12) + 1
    base_url = 'https://api.propublica.org/congress/v1/both/votes/'
    headers = {'X-API-Key': propublica_api_key}
    for month in months:
        url = base_url + str(year) + f'/{str(month)}.json'
        r = requests.get(url, headers=headers).json()
        votes = r['results']['votes']

        df = pd.DataFrame.from_dict(votes)

        #write file to s3
        output_filename = f"votes_{year}-{month}.csv"
        df.to_csv(f's3://{s3_bucket_name}/propublica/{output_filename}')
        print(f'Successfully wrote {output_filename} to s3 bucket')

    return
The line that actually writes the dataframe (df) back to the S3 is:
df.to_csv(f's3://{s3_bucket_name}/propublica/{output_filename}')
Here, /propublica tells us where to save the file in the S3 bucket. When implementing this, you will replace /propublica with the path to where you want to save your file.
Here’s a simple template you can modify to write your dataframe back to your S3 bucket as a csv file (replacing your_s3_bucket_name, path, and file_name):
df.to_csv(f's3://<your_s3_bucket_name>/<path>/<file_name>.csv')
Read a file from S3
First, let's see what files we have available by printing a list of files that exist in your S3 bucket.
The following code sets a boto3 session using the project’s Secret values, adds each file to a list (s3_files), and prints the filenames. The last line strips the path of the returned files, so that we’re only printing the filenames themselves.
session = boto3.Session(aws_access_key_id, aws_secret_access_key)

prefix = "propublica/"
s3 = boto3.resource('s3')
bucket = s3.Bucket(name=s3_bucket_name)
s3_files = []

print(f'Files in {prefix}:')
for obj in bucket.objects.filter(Prefix=prefix):
     s3_files.append(obj.key)
     print(obj.key.split('/')[1])
Here's the output from the above code snippet:
Files in propublica/:
votes_2020-1.csv
votes_2020-10.csv
votes_2020-11.csv
votes_2020-12.csv
votes_2020-2.csv
votes_2020-3.csv
votes_2020-4.csv
votes_2020-5.csv
votes_2020-6.csv
votes_2020-7.csv
votes_2020-8.csv
votes_2020-9.csv
From the options in this list, let’s read in a specific file. Here, we’re reading in the first file from the s3_files list:
filename = s3_files[0]
df_froms3 = pd.read_csv(f's3://{s3_bucket_name}/{filename}')
Note: The values in s3_files contain the path to the file, which is why we don’t need to specify a path in the above code.
Voilà! Now that we’ve read in the file from S3 and created a dataframe, you can visualize your new dataframe in a Chart cell or a Table Display cell, or perform data analysis using SQL or Python.
Remember, you can see this tutorial in action in its companion project!