Cloud storage integrations
Import and export files between your Amazon S3 cloud storage and Hex projects.
- Available on Professional, Team, and Enterprise plans.
- Users will need the Admin workspace role to create and grant access to cloud storage integrations.
- Users will need access to the integration and Can Edit or higher permissions to import and export files.
Hex cloud storage integrations allow you and your team to easily import CSV, JSON, and other files from your cloud storage into your Hex projects for use in your data notebooks and data apps.
Create a cloud storage integration
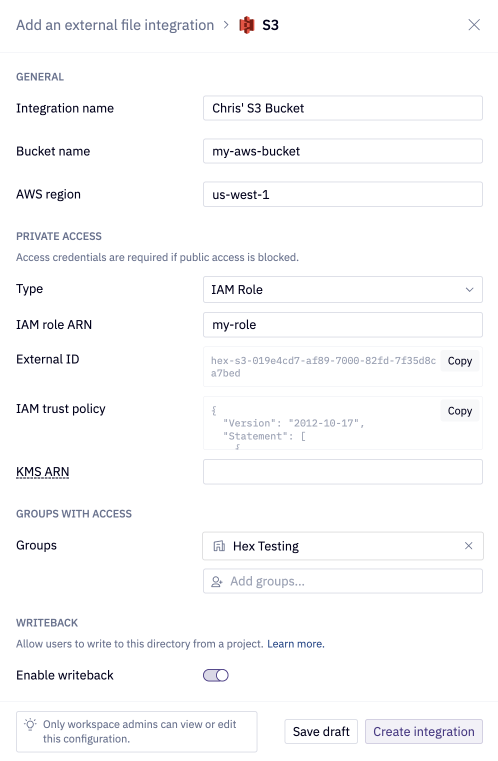
To create a cloud storage integration, go to Settings > Integrations > External file integrations and click + Connection. Select your cloud storage provider to open the integration form.
Amazon S3
To create an Amazon S3 integration, enter the bucket name and AWS region, then choose an authentication method. Hex supports two authentication methods for Amazon S3: access key and IAM role.
The IAM user or role Hex uses must be allowed to perform the s3:HeadBucket, s3:ListBucket, and s3:GetObject actions on the bucket, and on files and folders in the bucket. If writeback is enabled, s3:PutObject is also required.
The Enable writeback toggle controls whether the integration can export files from Hex to S3. Users with access to this integration will have the ability to read in files from the integration, and writeback abilities (if enabled).
IAM role authentication
-
Create an IAM role in AWS
In the AWS IAM console, create a new role with the permissions listed above and a placeholder trust policy. Copy the role's ARN. -
Save a draft integration in Hex
In the Amazon S3 integration form, select IAM role authentication, enter the bucket name, AWS region, and role ARN, and save the integration as a draft. -
Update the trust policy in AWS
Hex generates an external ID and IAM trust policy when you save the draft. Copy them into your role's trust policy in AWS. -
Finalize the integration in Hex
Return to the draft in Hex and complete the setup.
Hex includes the external ID on sts:AssumeRole but not on sts:TagSession. If your trust policy applies an sts:ExternalId condition to both actions, validation fails with an AccessDenied error on TagSession. Split your trust policy into separate statements (with distinct SIDs) and apply the external ID condition to sts:AssumeRole only.
Google Cloud Storage (GCS)
To set up your Service Account, you will need to enter the bucket name and a service account key JSON.
The service account will need to be granted the following permissions as a baseline for read access:
- storage.buckets.get
- storage.folders.get
- storage.folders.list
- storage.managedFolders.get
- storage.managedFolders.list
- storage.objects.get
- storage.objects.list
The Enable writeback toggle controls whether or not the integration can export files from Hex to GCS. If enabled, the service account needs to also be granted the following permissions:
- storage.folders.create
- storage.folders.delete
- storage.folders.rename
- storage.managedFolders.create
- storage.managedFolders.delete
- storage.multipartUploads.abort
- storage.multipartUploads.create
- storage.multipartUploads.list
- storage.multipartUploads.listParts
- storage.objects.create
- storage.objects.delete
- storage.objects.move
- storage.objects.restore
- storage.objects.update
If you give the service account the Storage Object User role, most of these permissions are covered. You will just need to add the storage.buckets.get permission on top.
Google Drive
Go through the authorization flow to authorize Hex to connect to your Google Drive account. Once you authorize your account, other users in the workspace will be able to use these credentials to set up Google Drive connections.
After you authenticate, you will be brought back to the new integration modal in Hex where you can connect to a specific Google Drive directory. Because members of the workspace can use these credentials, it's not possible to connect to a user's "My Drive". Instead a Subdirectory ID is required to connect to a specific directory.
Set up a separate Google Drive directory for Hex to connect to, rather than reusing an existing directory.
To find your Subdirectory ID, navigate to the directory in Google Drive, and copy the ID after folders/ in the URL. Due to limitations of the Google Drive API, any nested subdirectories within this folder will need to be created as separate integrations.
The Enable writeback toggle will control whether or not the integration can export files from Hex to the specified Google Drive folder.
Users with access to this integration will have the ability to read in files from the specified Google Drive folder, and writeback abilities (if enabled).
Import files from your cloud storage integration
In your project, open the Files sidebar. Under the External file integrations header, select Import on the appropriate integration and select the files you want to import.
Files imported from a cloud storage integration will count towards the project's 100 file limit. Each individual file is limited to 10 GB.
Files imported to your project will be downloaded at time of import, and again each time your project kernel starts. The larger the total file size in your project, the longer it will take to start your project each time it's opened. We recommend deleting any unused files to optimize project performance. Learn more about working with files.
Reference imported files in Python
Files you import from your cloud storage integration are stored in a subdirectory of your project’s Hex directory with the naming pattern external-files/\{integration_type\}/\{integration_name\}. The integration name will be in lower-case with any non-alphanumeric characters removed, and spaces replaced by underscores. For example, the path for an S3 integration named "Hex's Testing Bucket" would be external-files/s3/hexs_testing_bucket. The path for a Google Drive integration named "Hex's Test Drive" would be external-files/googledrive/hexs_test_drive.
Export files to your cloud storage integration
Hex watches the subdirectory associated with your cloud storage integration for new files and for updates to existing files. Changes are automatically exported to your cloud storage provider.
For example, if a CSV file were created from a dataframe using dataframe.to_csv('external-files/s3/hexs_testing_bucket/my_new_data.csv'), Hex would write the file my_new_data.csv to the appropriate Amazon S3 bucket. Similarly, dataframe.to_csv('external-files/googledrive/hexs_test_drive/my_new_data.csv') will write the file my_new_data.csv to the Google Drive folder designated in the integration configuration.
Note that files created in this way will not be automatically imported into the project and will no longer be present once the kernel restarts.