App notifications
Get notified when an app is refreshed, or only when a certain condition is met.
- Available on the Team and Enterprise plans.
- Users with Can Edit or higher project permissions can manage all notifications on a project.
- Users with Can Explore project permissions can set up notifications for themselves.
There are two types of app notifications that can be created:
- Subscriptions: Get notified when a scheduled run completes (with optional file attachments), or be notified if the scheduled run errors.
- Conditional notifications: Get notified when a data condition is met from a scheduled run.
Create an app notification
To create a notification:
- Open the scheduled runs sidebar in either the published app or notebook view.
- In the top right-hand corner, select Add notification.
- Select Subscription or Conditional notification, and then configure the notification.
You can also add a notification to an existing scheduled run by clicking on the scheduled run entry in the sidebar, then selecting + Add notification.
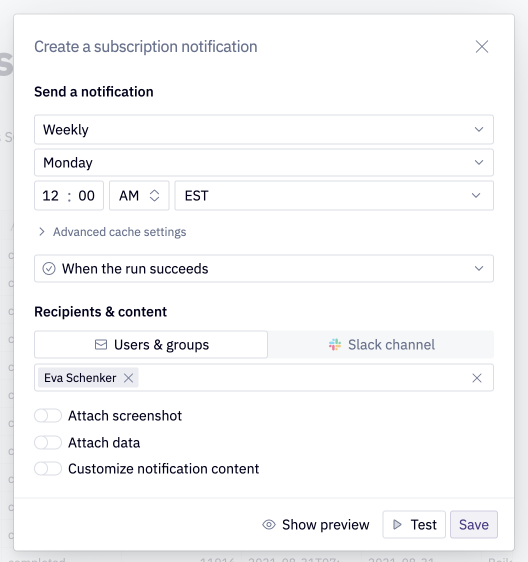
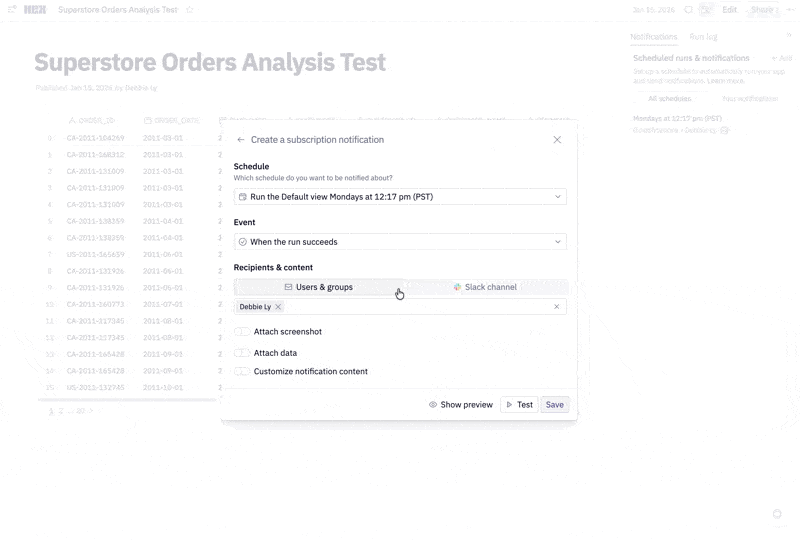
Subscriptions
When configuring a subscription, you can choose:
- Which scheduled run to tie the subscription to (or optionally create a new scheduled run).
- Whether to be notified when the scheduled run succeeds, errors, or both.
- If saved views are available for the app, which views to subscribe to. A maximum of three saved views can be configured for a notification.
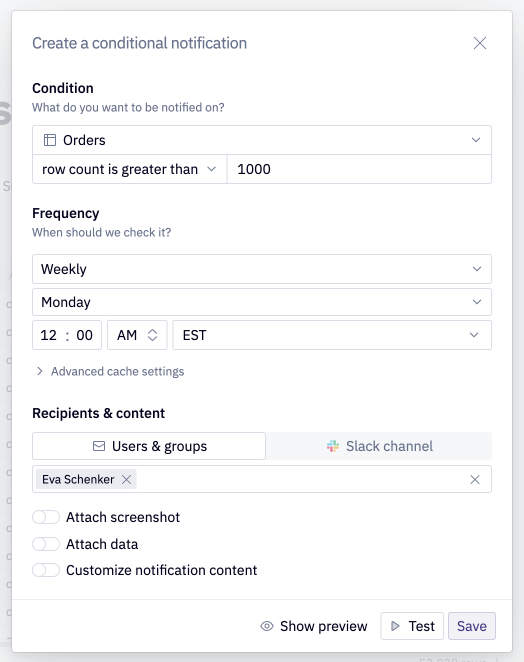
Conditional notifications
Use the bell icon on a Single Value or Table Display cell in a published app to quickly create a conditional notification. If you've changed the inputs in an app, you will be prompted to save your combination of inputs as a saved view first.
When configuring a conditional notification, you can choose:
- The condition to evaluate
- The frequency of when the condition should be checked, via an existing or new scheduled run.
- If saved views are available for the app, which views should be used when evaluating the condition.
The following types of cells can be used to define a conditional notification:
- Single value cells: Evaluate the numeric value in a single value cell against a condition.
- Table display cells: Evaluate the number of rows returned by a table display cell against a condition.
Note: Cells must be included in the app to be used in a conditional notification criteria. Conditional notifications can only be created from the published app.
Configure notification delivery
There are two main delivery methods for app notifications:
- Users & groups: Deliver a notification to users and groups
- Slack channels: Deliver a notification to a Slack channel
Notify users & groups
This option delivers a notification directly to users and groups via in-app notifications, email and Slack — the delivery channel depends on the recipient's notification preferences.
Notifications delivered via Slack are sent as a direct message from the Hex integration to each recipient. These are distinct from Slack channel notifications outlined below.
Users with Can Edit project permissions can create subscription notifications for themselves and on behalf of others, as well as manage all notifications on an app.
Users with Can Explore project permissions can set only set up notifications for themselves.
A user must have Can View App project permissions or higher permissions to receive app notifications. If you attempt to send notifications to a user or group that does not have access to the project, the user(s) will automatically be granted Can View App access.
Notify a Slack channel
This option sends notifications to a Slack channel, rather than an individual user. They can be configured by users with Can Edit project permissions.
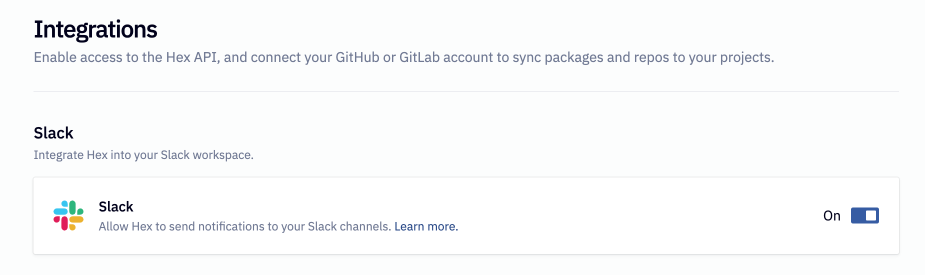
To send Slack channel notifications, an Admin will first need to need to configure the Hex integration for Slack from Settings > Integrations.
The first time you set up a Slack notification by selecting the Send to Slack channel option, you'll be prompted to link your personal Slack account with the Sign in button.
To send an app notification to a private Slack channel, first add the Hex integration to the channel and refresh the page where you are configuring the schedule.
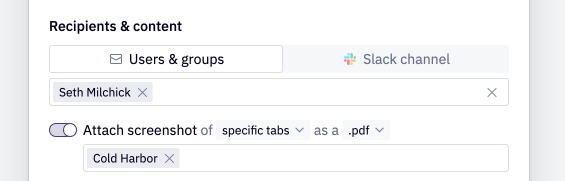
Attaching screenshots
App notifications can optionally include an app screenshot attachment.
To attach a screenshot to a notification, enable the Attach screenshot toggle and choose from PNG or PDF format. The ability to attach a screenshot to a notification is disabled for projects that use a data connection with any limitations on which users Can view results.
App notifications are limited to 10MB of total attachment file size.
For apps with tabs, a maximum of six tabs can be attached to notifications. You can also choose which tabs should be included in the notifications.
When sending a conditional notification, you a can attach screenshot of just the cell that triggered the notification.
Notification content
When configuring a notification, users can customize the subject line and add an additional message to the body.

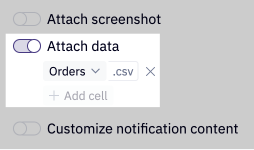
Attaching data exports (CSV, Google Sheets)
CSV
App notifications can optionally include CSV attachments for any data table in the published app.
To attach a data export to a notification, enable the Attach data toggle and select a table from the drop-down menu. The ability to attach CSVs to a notification is disabled for projects that use a data connection with any limitations on which users Can view results.
App notifications are limited to a maximum of 5 CSV file attachments and a maximum of 8MB total CSV file size.
If an app notification exceeds the attachment size or count limits, recipients will receive the scheduled notification with a message explaining why the attachments failed.
Google Sheets
Choose an output dataframe and deliver it directly to a Google Sheet, either by creating a new tab or writing into an existing destination. This makes it easy to share data with teams that live in Sheets, without manual CSV downloads or custom scripts.