App builder
Use the App builder to compose cells from your Hex project into a beautiful published App that you can share with anyone.
- Available on all pricing plans.
- Users will need Can Edit or higher project permissions to use the App builder.
Add cells to your App
The first time you navigate to the App builder in a project Hex auto-generates an app based on the contents of your Notebook view. You can add, remove, reposition, and resize elements to customize the layout of your app. Additionally, you can add multiple tabs to organize cells into different views.
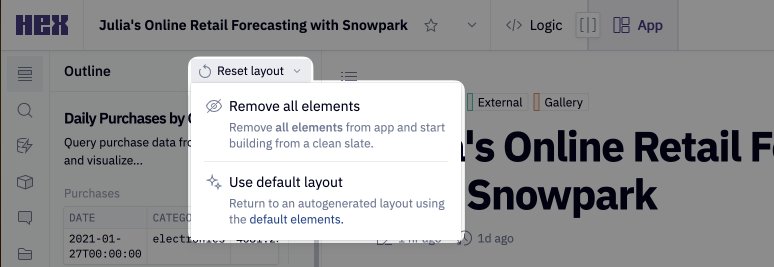
If you prefer to start building from scratch, select the Remove all elements option from the Reset layout dropdown menu at the top of the Outline tab in the left sidebar.
You can undo a change to the App builder at any time, including removing all elements or resetting to the default layout.
You can drag-and-drop elements from the left-hand Outline panel using the drag handle to its right. Alternatively, you can use the Add to app button on each element, from the Outline or Notebook view.
Arrange and format cells in your App
Dragging
You can drag cells from the Outline to add elements to existing rows or to new rows.
Resizing
When elements are added to an existing row, Hex will split them proportionally until you've customized the size of an element in that row. At any time, you can adjust the size of elements by clicking and dragging from the left or right side of an element, where a double arrow appears.
Row-level actions
You can perform actions on entire rows of elements to modify the layout of your application.
Equal distribution & size
- If you've customized the width of elements in a row and wish to return to a more standardized layout, click the distribution icon that appears when hovering over a row. This will evenly distribute and resize the elements in a row.
Move row
- You can move an entire row with all of its elements up and down in your application by clicking and dragging the move row button that appears when hovering over a row.
App tabs
Separate your app into different views with App tabs. You can add multiple tabs to your published apps to break down your project into different sections for a more dashboard-like experience. Add and rename tabs from App Settings in the right sidebar.
You can drag and drop cells between tabs, and also add apps to specific tabs from the Outline, Notebook view, or App builder.
You can add a cell to as many tabs as you'd like. To do this, click on the App builder icon on a cell in the Outline or App builder, and select each tab you'd like to add this cell to.

When a published app with tabs is run, the full project is still executed in the order of cells in the Notebook view.
Element display options
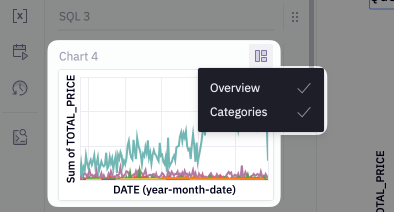
When adding python or SQL cells to your app, there are 3 options in the cell menu to customize how the cell appears in the app.
- Source: only show cell source code
- Output: only show cell output
- Source and output: show both cell source code and output
Reset layout

At any time, you can return to the default autogenerated app layout, or remove all elements. From the Reset layout dropdown you can select the following options:
- Remove all elements: Removes all elements from the app builder, allowing you to drag and drop onto a clean slate.
- Use default layout: Resets your app to include the all default elements in linear order (Markdown, Text, Chart, Map, Single value, Table display, and Input cells).
App display settings
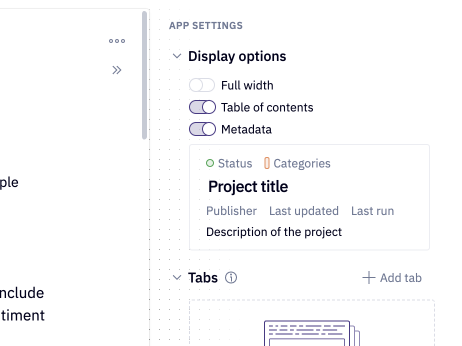
You can update Display options from the App settings menu in the app builder.
Options include the ability to display table of content in addition to any project metadata at the top of your published app.
The table of contents is automatically created based on markdown and text cell headers in your Notebook view, as well as any App tabs.

- Full width: By default, Hex apps are constrained to a continuous page-like layout with a maximum width. Enabling the full width removes the maximum width, and Hex uses the width of the browser instead. Enabling this is useful for dashboard-style Hex apps.
- Table of contents: When on, a dynamic table of contents will be generated based on headings in the markdown and text cell included in the app.
- Metadata: When on, project metadata will be included as part of the app layout. Interact with the metadata preview to toggle individual fields on and off, including:
- Name
- Description
- Author
- Last edited
- Categories
- Status
App theme
Set a theme for your published app to customize the look and feel.

Hex themes
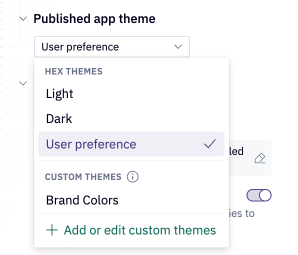
Hex themes include Light, Dark, and User preference.
The default value is User preference, which will choose Light or Dark based on authenticated users' theme Preference and unauthenticated users' device settings.
Selecting Light or Dark will force all users to see the same theme, regardless of their preferences.
Custom themes
Team and Enterprise plan customers can also create Custom app themes, configured by an Admin from Settings > Custom styling. Custom themes apply to all users viewing a published app.
Customers who purchased the Embedded Analytics add-on on the Enterprise plan can use custom themes with signed embedding to create a fully white-labeled experience for clients and customers.
FAQs
Is there a built-in variable to detect light or dark mode?
Editors often want to use this variable in order to customize the look and feel of an app based on whether the user viewing the app uses light or dark mode. This is particularly common when building visualizations with Python.
No such built-in variable exists, because, in many cases, this would still lead to inconsistent theming.
For example:
- An app's outputs are updated via a scheduled run, which executes in light mode. A user views the app in dark mode — they would see the previously computed light mode outputs. On rerun, the outputs would switch to dark mode.
- An editor is editing the app in dark mode. Another editor, who uses light mode, edits the app at the same time. Depending on who runs the cell, the value of the current theme would change, resulting in inconsistent outputs.
Instead, in this scenario we recommend that you choose either Light or Dark mode for an app — this way you have more control over what Viewers will see in the app, and don't need to customize it for both cases.