Custom images
- Available on select Enterprise plans. Contact [email protected] to request access.
By default, Hex is set up with images for multiple versions of Python, each of which contain many pre-installed packages. These images are often sufficient for most projects, and are designed to get users off the ground quickly.
In addition to these options, Hex supports custom images. Custom images give you significantly more control over what is included in the images accessible to users, allowing you to tailor an environment to suit your needs.

Custom images allow you to include additional packages and dependencies in your Docker image.
Hex does not audit, verify, or maintain third-party packages you add to custom images. Hex is not responsible for the security, reliability, and compatibility of added packages, and including untrusted or outdated packages may introduce security vulnerabilities to your environment.
Connect a repository
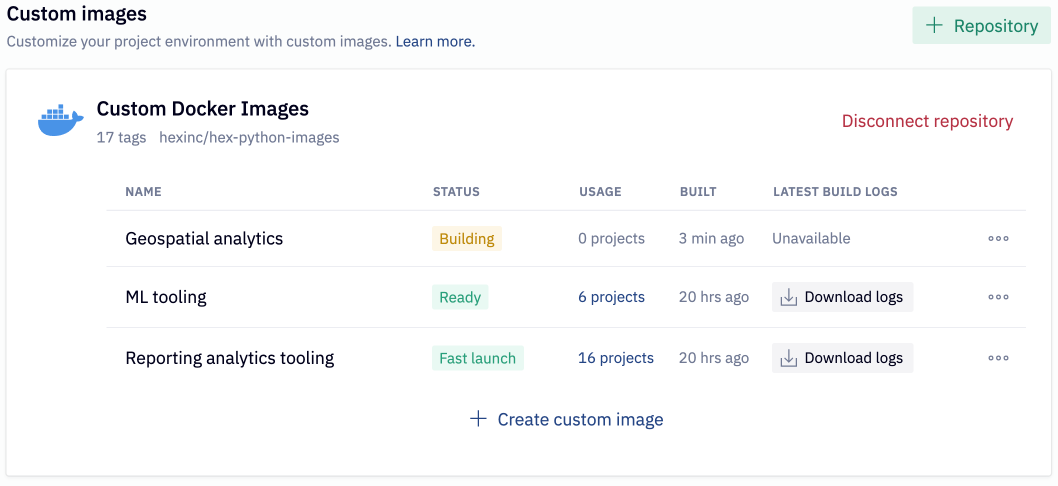
From the Environment page in the workspace settings, Admins can connect to a Docker repository by clicking on the green Repository button next to the Custom images header. Hex supports repositories hosted in Docker Hub, Amazon Elastic Container Registry (ECR), and Google Artifact Registry.
Docker Hub
To connect to a Docker Hub repository, you will need the following information:
- Namespace (if the repository is not public)
- Repository name
- Username
- Password
The user must have at least have at least Read-only access to the repository.
Amazon ECR
To connect to an Amazon ECR repository, you will need the following:
- The path to your registry:
{aws_account_id}.dkr.ecr.{aws_region}.amazonaws.com - The repository namespace
- The repository name
- An IAM role that Hex can assume to access your ECR repository OR
- IAM user or service account that can be granted an IAM policy and AWS IAM access keys
Authentication Setup
Hex supports IAM role-based authentication as the default to securely access your ECR repositories. This approach uses temporary credentials and follows AWS security best practices. You can also choose to use IAM access keys.
Using IAM roles
Step 1: Create an IAM role for accessing your ECR repository
The IAM role must have permissions to perform the following actions on your ECR repository. See AWS’s Private Repository Policies docs for more details:
ecr:DescribeImagesecr:BatchGetImageecr:GetDownloadUrlForLayerecr:ListImagesecr:ListTagsForResourceecr:GetAuthorizationToken
Example IAM policy
{
  # Attach this policy to your IAM role:
  "Version": "2012-10-17",
  "Statement": [
    {
      "Sid": "AllowReadAccessForHex",
      "Effect": "Allow",
      "Action": [
        "ecr:DescribeImages",
        "ecr:BatchGetImage",
        "ecr:GetDownloadUrlForLayer",
        "ecr:ListTagsForResource",
        "ecr:ListImages"
      ],
      "Resource": "arn:aws:ecr:{aws_region}:{aws_account_id}:repository/{ecr_name}"
    },
    {
      "Sid": "AllowAuthorizationForHex",
      "Effect": "Allow",
      "Action": "ecr:GetAuthorizationToken",
      "Resource": "*"
    }
  ]
}
Step 2: Begin ECR repository configuration in Hex
In the ECR connection dialog:
- On your Hex environment settings page, click
+ Repositoryand selectAmazon ECR. - Select IAM Role as the authentication type
- Enter your IAM Role ARN:
arn:aws:iam::{aws_account_id}:role/{role_name} - Copy the OIDC provider URL, OIDC subscriber, and OIDC audience values, to be used in the following steps. You’ll return to this page after completing your AWS configuration.
Step 3: Add Hex as an AWS Identity Provider
In the AWS IAM console, add an Identity Provider configured with the OIDC provider URL and OIDC audience value copied from step 2.
Step 4: Configure IAM Role Trust Policy
{
  # Configure your ECR IAM role with the following trust policy:
  "Version": "2012-10-17",
  "Statement": [
    {
      "Action": "sts:AssumeRoleWithWebIdentity",
      "Effect": "Allow",
      "Principal": {
        "Federated": "arn:aws:iam::[Your AWS account ID]:oidc-provider/[Hex OIDC provider URL]"
      },
      "Condition": {
        "StringEquals": {
          "[Hex OIDC provider url]:sub": "[Hex OIDC subscriber]"
        }
      }
    }
  ]
}
Step 5: Complete configuration in Hex
Back in the ECR connection dialog, click Connect repository to test the connection and complete the setup.
Using access keys
The IAM user or service account must have permissions to perform the following actions. See AWS’s Private Repository Policies docs for instructions on and examples for how to set up these permissions:
ecr:DescribeImagesecr:BatchGetImageecr:GetDownloadUrlForLayerecr:ListImagesecr:ListTagsForResourceecr:GetAuthorizationToken- Note that the GetAuthorizationToken action of ECR needs the resource to connect with Docker. See the code below for an example of how to set up the resource permissions.
Example of AWS IAM policy:
{
  "Version": "2024-02-16",
  "Statement":
    [
      {
        "Sid": "AllowReadAccessForHex",
        "Effect": "Allow",
        "Action":
          [
            "ecr:DescribeImages",
            "ecr:BatchGetImage",
            "ecr:GetDownloadUrlForLayer",
            "ecr:ListTagsForResource",
            "ecr:ListImages"
          ],
        "Resource": "arn:aws:ecr:{aws_region}:{aws_account_id}:repository/{erc_name}"
      },
      {
        "Sid": "AllowAuthorizationForHex",
        "Effect": "Allow",
        "Action": "ecr:GetAuthorizationToken",
        "Resource": "*"
      }
    ]
}
Google Artifact Registry
Setting Up Permissions in Google Cloud
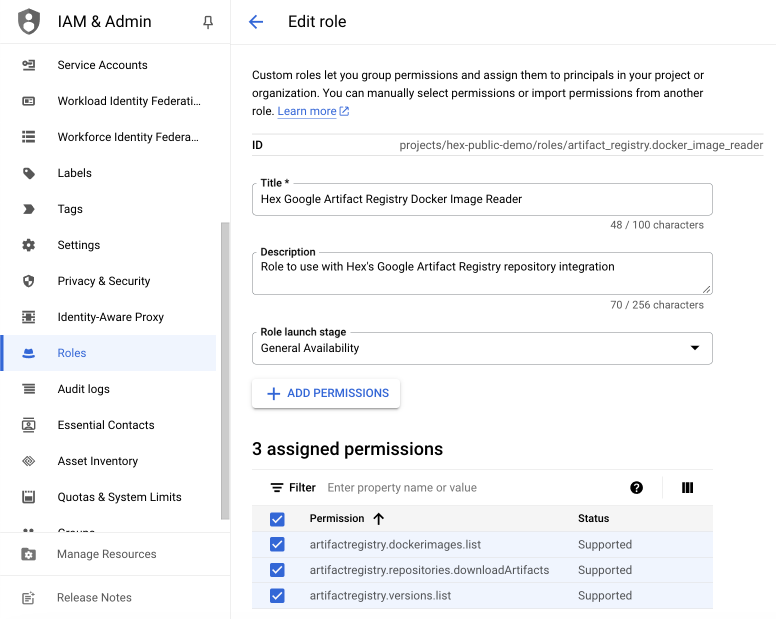
In order to add images from a Google Artifact Registry repository, you will need to connect the repository to Hex through a Google service account. You can create a service account with the appropriate permissions through the IAM and Admin section of Google Cloud’s console. That service account needs to be in the same project as the repository and must be granted a role with the following permissions:
- artifactregistry.dockerimages.list
- artifactregistry.versions.list
- artifactregistry.repositories.downloadArtifacts
If needed, you can create a new role with the above permissions through Google Cloud’s IAM and Admin section under Roles (see Google’s documentation for more information). Below is an example of a role with the permissions needed to connect to Hex. Apply the role to the service account that will be used to connect to Hex.

Connection
Once the appropriate access is set up in Google Cloud, you will need the following information to connect in Hex:
- General
- Name: The name you want to call the repository in Hex
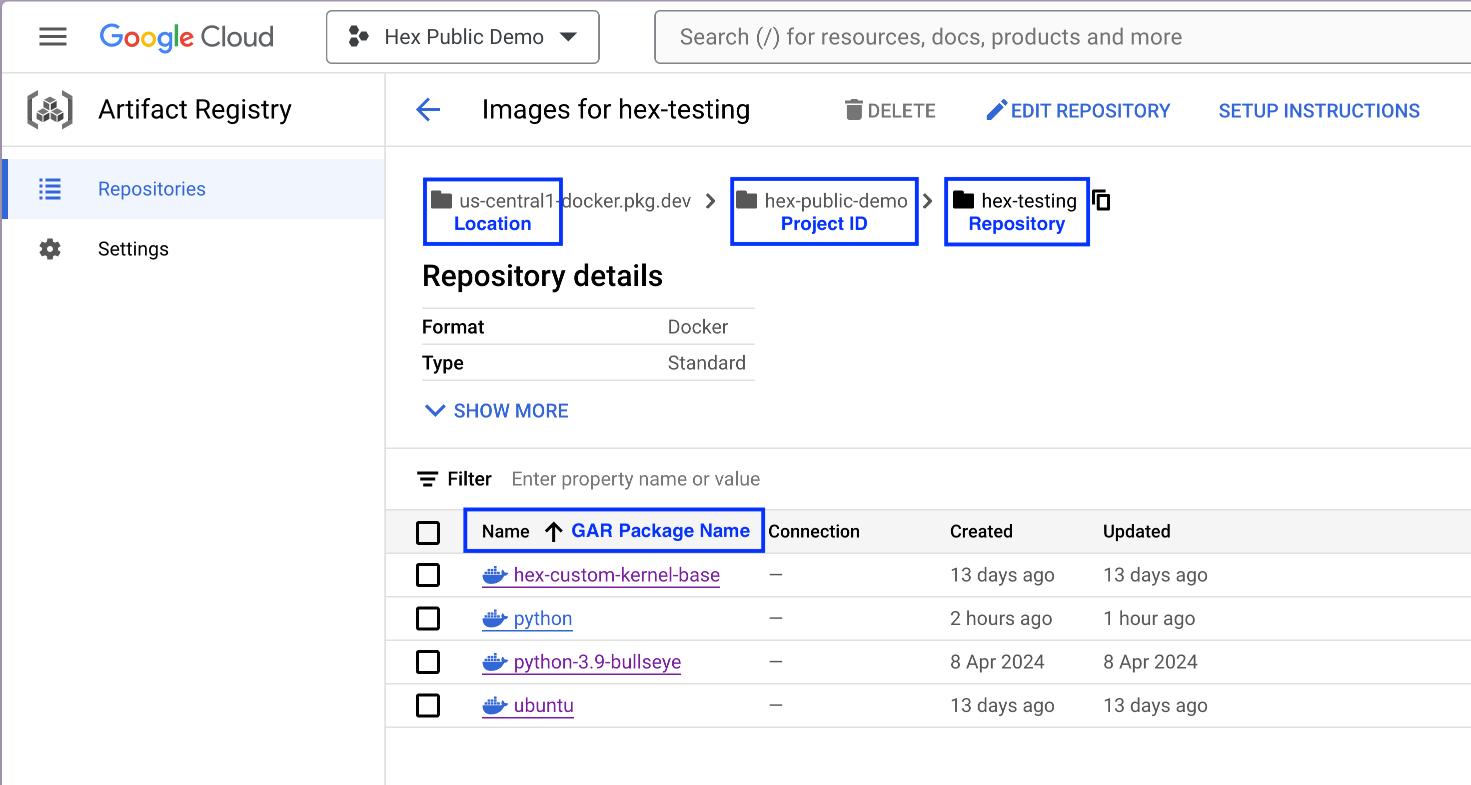
- Repository: This information can be found in Google Artifact Registry
- Project ID
- Location
- Repository
- GAR Package Name
- Authentication
- Service account configuration (JSON)
- Create a service account key from the service account with the required permissions. Download the service account key as a JSON. Include the entire contents of the JSON file in this field.
- Service account configuration (JSON)

Prepare an image
Requirements
Hex utilizes EC2 Image Builder to bundle Hex on top of your image. As part of this process, there are certain Python packages core to Hex's functionality which will be installed on top of your image at specific versions that cannot be altered. For more information see our docs on fixed package versions.
In order to be able to properly build the image, the following are required:
- The operating system supports AMD64 architecture
- A supported Python version is installed (3.9, 3.10, 3.11)
- Root user has execute access on the
/tmp/directory - The image is based on a Debian-compatible distribution
- The following tools are installed and accessible in the image's
PATH:bashtar
Set Python environment
Hex defaults to using a Poetry virtual environment and the default version of Python set in the image. If multiple versions of Python are installed, you can set the HEX_POETRY_ENV_USE variable to the desired version of Python. For example:
ENV HEX_POETRY_ENV_USE=3.10
This value will be used to set the Poetry environment via the env use command. The Poetry virtual environment will also set the system-site-packages virtualenv option to true, retaining the environment's access to system site packages.
Hex also supports the use of Conda environments by setting the HEX_USE_CONDA environment variable, which will default to using a Conda environment named "base". If you have a different Conda environment, you can set it using the HEX_CONDA_ENV_NAME variable:
ENV HEX_USE_CONDA=true
ENV HEX_CONDA_ENV_NAME=<conda_env_to_use>
This will also set the Python version defined by the Conda environment.
We also recommend installing uv in your custom image, so that users can benefit from much faster package installation.
Custom IPython events
Custom IPython event callbacks can be enabled by setting the HEX_CUSTOM_EVENTS_FILE variable to the path of a Python file where the events are registered:
ENV HEX_CUSTOM_EVENTS_FILE=/custom_events.py
The file will be copied into the working directory of the Python kernel and so the file can import any packages Hex has access to. If the file cannot be accessed, the image build will fail. If the file errors on import or an event gives an error, they will be displayed as warnings or errors in the outputs of cell runs.
Hex does not support callbacks on the shell_initialized event.
Push your image to Hex
Once you have prepared the Docker image, you can build, tag, and push the image to the repository. Hex will use the tag to identify new images and updates to existing images. For information on building, tagging, and pushing the image to your repository, please see the DockerHub, AWS ECR or Google Artifact Registry docs on the topic.
Manage images
Images can be created and managed from the Environment page in the workspace settings. There you will see the current build status of your images, the number of projects they are used in, and the build date. You can also rename, see previous versions of, or delete images from the three-dot menu to the right of the image.
Create an image
You can create an image using the Create custom images beneath a connected image repository, and then Create custom image next to the tag you want to make available as an image. If it's a recently pushed tag, you may need to refresh the tags using the Refresh tags button. Hex will immediately begin pulling the image and show the build status beneath the connected repository.
Checking logs
Logs from the Hex's docker build can be downloaded from the Environment page of the workspace settings. Once an image build has succeeded or failed, the image will contain a link to download the latest build logs. Build logs from previous versions can be downloaded when viewing previous image versions.
Rename an image
By default, image names are inherited from the Docker tag attached to the image when it is initially pushed to the repository. The image name can be altered by selecting Edit image from the three-dot menu to the right of the image. The name selected will display for developers when they select an image for their project.
View image versions
Hex tracks version history when new images are pushed with the same tag and overwrites the existing image with the new image. You can view the date and digest of a previous version, including the build logs, by selecting See versions from the three-dot menu to the right of the image.
Delete an image
Images can be deleted if they are no longer necessary. Beware that deleting an image will leave any projects with the image currently selected in a broken state where they must select a new image before they are usable again. To delete an image, select Delete kernel image from the three-dot menu to the right of the image.
Deleting an image will immediately break any published apps that utilize the image, until the project is published with a new image selected.
Fast launch
Enable fast launch
Fast launch can be enabled on an image from the Edit image modal, accessed via the three-dot menu to the right of the image. The number of images that can have fast launch enabled is limited by workspace. Once you have reached the maximum number of fast launch images, the toggle will be disabled and show a message indicating that you need to fast launch needs to be disabled on another image in order to enable it on the new image. To alter the number of images you can enable fast Launch for, please contact [email protected].
How fast launch works
When fast launch is disabled, it can take several minutes for a kernel to start and become available to be used in a project. The more complex the image is, the longer it will take to start.
When fast launch is enabled, Hex will keep a designated number of pre-started kernels running in the background. Each of these running kernels can be immediately allocated to a user when they request a kernel (for a published app run, starting or restarting a kernel in Notebook view, etc.). When a user launches a kernel, Hex will start a new kernel in the background to allocate into the pool of fast launch kernels. This means that the only time a user will need to wait for a kernel to start from scratch is if several kernels have been started in rapid succession, before the pool of fast launch kernels has been refilled. Note that fast launch is enabled by default on Hex's native images.
Limitations
Image size limit
Custom kernel images may not exceed 20 GB in size. This is to ensure fast builds, reliable execution, and efficient storage usage.
Recommended Practice
- Remove unused packages and dependencies
- Clean up temporary files, caches, and build artifacts
- Prefer slim base images whenever possible
Image retention policy
Custom kernel images are retained for up to 18 months after their last use. “Last use” refers to the most recent time the image was used within Hex. If an image remains unused for 18 consecutive months, it may be automatically deleted. Deleted images cannot be recovered and must be re-uploaded if needed again in the future.