Signed embedding
Use the Hex Embed API to securely embed Hex apps in your own web application with pass-through authentication and row-level security.
- Available with the Embedded Analytics add-on for customers on the Enterprise plan.
- Contact [email protected] to request a trial.
What is signed embedding?
Hex's Embedded Analytics product offering supports signed embedding, which allows you to securely embed Hex apps in your own web application without requiring your users to authenticate into Hex. You can optionally implement row-level security to ensure your users can access only their unique data. Embed users can interact with inputs, filter charts and tables, and optionally export content as PDF or CSV.
You can implement signed embedding using Hex's Embed API, which accepts a Hex project ID and any identifying attributes about the embed user, and returns a single-use presigned URL that can be embedded in an iframe. The presigning ensures each URL can be viewed exactly once, protecting against link sharing and session replay attacks. This allows you to securely embed Hex content without requiring your users to log in to Hex.
Signed embedding is the best choice for secure, seamless embedded analytics. In contrast to public embedding, it doesn't require sharing your Hex app publicly and relying on security by obscurity. In contrast to private embedding, it doesn't require your end users to manage a Hex login.
Configure a project for signed embedding
To use signed embedding, the feature must be enabled on your Hex workspace. For assistance, contact your account team or [email protected].
Enable signed embedding on a project
From the Share modal in the top right corner of your Hex project, toggle on Allow signed embedding.

Enabling signed embedding will allow API clients to generate the single-use signed URLs for your project that you’ll embed in your web application.
For Hex projects you plan to embed, we recommend requiring reviews and limiting the number of users with Can edit or higher permissions on the project.
Build your analysis
Note there are a few best practices for building a project for embedded analytics to ensure optimal app performance. These include building with SQL and no-code cells rather than code cells, using the default Medium compute profile, and keeping the total number of cells in your project to a minimum.
Implement row-level security
You can optionally configure your signed embedding project to dynamically filter the data for each user based on hex_user_attributes that you pass in your API request.
To do so, you must add a parameterized SQL query that filters your base data on one or more hex_user_attributes in a where clause. You also must specify these hex_user_attributes in the Variables sidebar of your Hex Project.
Test row-level security with hex_user_attribute preview values
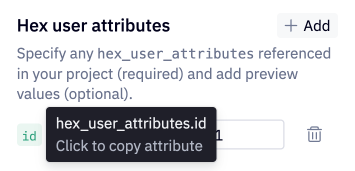
When you specify your hex_user_attributes in the Variables sidebar, you will be prompted to enter a preview value for each attribute. These values will be used to run the app in the Notebook view and App builder so that you can see what the app will look like to a specific embed user.
Hovering over the hex_user_attribute value (as shown below) allows you to copy the attribute to your clipboard.
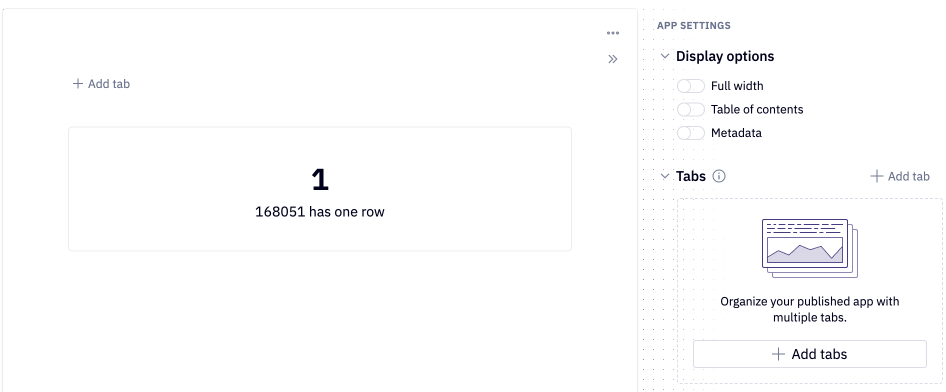
Arrange your app
Use the App builder tab to arrange your app how you would like it to appear for your users. You can remove the project title and other metadata from App settings > Display options in the right hand sidebar of the App builder.
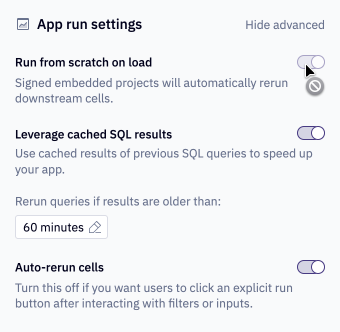
Configure run settings
Additionally, configure the run settings for your app. Note that some settings are uneditable when using signed embedding, in particular:
- Run from scratch on load will be enabled, and uneditable. This is to ensure all users see distinct outputs, and no data is shared between them.
- Auto-refresh published results is not available. This is because, unlike typical Hex apps, there is no concept of published results that are shared between users.
Publish your app
Once you're satisfied with your app, publish the latest version. If you implemented row-level security with hex_user_attributes, the published app should fail to render data in any cells that are built from the filtered data source. Without valid hex_user_attribute values passed via API, these parts of your app will not render.
Implement the Embed API
Once you've published your Hex app, you can reference it in your Embed API request.
Hex’s createPresignedUrl public API endpoint accepts a workspace token, base URL for your Hex workspace, Hex project id, and optional hex user attributes, and returns a single-use signed URL that you can embed in an iframe.
You can find the full API reference for createPresignedUrl in our API reference doc.
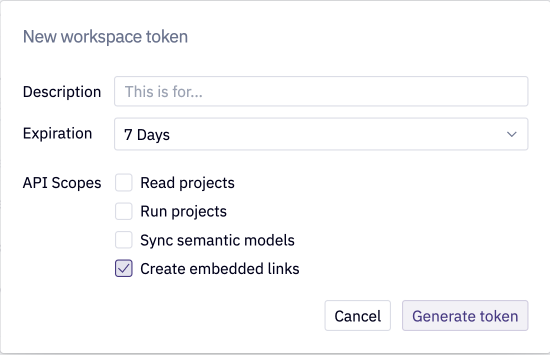
Generate an Embed API workspace token
From Settings > API keys, a Workspace Admin will need to create a new workspace token with your desired expiration (“No Expiry” is recommended) and the "Create embedded links" API scope.
Implement Embed API requests
The createPresignedUrl must be implemented server-side in a secure part of your web application's code. Implementing the API client-side will create a security vulnerability. Hex customers are responsible for implementing Hex signed embedding securely (with or without row-level security) and ensuring users viewing embedded apps are authorized to do so.
To make an API request, set the BASE_HEX_API_URL key equal to your Hex workspace's base URL. For most customers, this will be https://app.hex.tech/api/v1. For single tenant, EU multi tenant, and HIPAA multi tenant customers, replace app.hex.tech with your custom URL (e.g. atreides.hex.tech, eu.hex.tech).
Set the TOKEN key equal to the workspace token you generated in the step above.
Set the PROJECT_ID key equal to the project id associated with your app. You can find the project id in the Variables sidebar of the Hex project.
In the request body:
- Optionally specify any
hex_user_attributesthat will be used to implement row-level security. - Optionally pass in additional scope to grant specific permissions to your users viewing the embedded app. For example, allow users to export a CSV from a table by passing in scope: ["EXPORT_CSV"]).
- Optionally set
displayOptions: { noEmbedFooter: true, noEmbedOutline: true }options in the request body to customize the content display in your iframe. - Optionally pass in any desired
inputParametersvalues, which can be any JSON value and will be passed to the relevant input parameter(s) on your published app as a string.
Example Embed API requests
- Python
- Javascript
import requests

BASE_HEX_API_URL = 'https://app.hex.tech/api/v1'
# this token is invalid
TOKEN = '812d64548435bb81f6e974a25bf841fa13af1c68b89b2f453d734d7d272daa3c70e43bf1a0460687a7ac76ba085300b5'
PROJECT_ID = 'd148ce6e-fc3b-40cb-9bdc-52b02d470061'
body = {
  "hexUserAttributes": {
    "userId": "12345",
    "userRole": "admin",
    "userCountry": "MEX"
  },
  "scope": ["EXPORT_PDF", "EXPORT_CSV"],
  "expiresIn": 30000,
  "displayOptions": {
    "noEmbedFooter": true,
    "noEmbedOutline": true,
    "noEmbedBasePadding": true
  }
}
response = requests.post(
url=f"{BASE_HEX_API_URL}/embedding/createPresignedUrl/{PROJECT_ID}",
json=body, headers={"Authorization" : f"Bearer {TOKEN}"}
)
print(response.json().get("url"))
const BASE_HEX_API_URL = "https://app.hex.tech/api/v1";
// This token is invalid
const TOKEN =
  "812d64548435bb81f6e974a25bf841fa13af1c68b89b2f453d734d7d272daa3c70e43bf1a0460687a7ac76ba085300b5";
const PROJECT_ID = "d148ce6e-fc3b-40cb-9bdc-52b02d470061";

const body = {
  hexUserAttributes: {
    userId: "12345",
    userRole: "admin",
    userCountry: "MEX",
  },
  scope: ["EXPORT_PDF", "EXPORT_CSV"],
  expiresIn: 30000,
  displayOptions: {
    noEmbedFooter: true,
    noEmbedOutline: true,
    noEmbedBasePadding: true,
  },
};

// You may need to import a node-fetch package if you are on a node version < 22
// `npm i node-fetch` in the same directory and include `const fetch = require('node-fetch')`at the top of this script
fetch(`${BASE_HEX_API_URL}/embedding/createPresignedUrl/${PROJECT_ID}`, {
  method: "POST",
  headers: {
    Authorization: `Bearer ${TOKEN}`,
    "Content-Type": "application/json",
  },
  body: JSON.stringify(body),
})
  .then((response) => response.json())
  .then((data) => {
    console.log(data.url);
  })
  .catch((error) => {
    console.error("Error:", error);
  });
Embed API test mode
To test your Embed API implementation without contributing to your usage limit, you can enable test mode by adding testMode: true to the body of your API request. Test mode API requests will not return a single-use signed URL for your Hex project. Instead test mode will return a standard URL to confirm the API request was structured correctly.
Common (Non-URL) API responses
400/401/403: These API responses indicate an unauthorized, forbidden, or otherwise bad request. The cause for this response could be any of the following (non-exhaustive):
- No authentication method: ensure that there is an
Authorization: Bearer {token}header in the request - Invalid token, or token without the
create embedded linksscope: this can be configured in the Workspace token settings - Expired token
- Incorrect
baseUrlorprojectId - Signed embedding isn't enabled on the project
424: A 424 response indicates a malformed request. If you see this response, make sure to confirm the following:
Content-type: application/jsonis being set on the request headers- The request body includes the required parameters (specified in API request setup section)
- The project is published
Embed API rate limit
For multi-tenant customers, the Embed API rate limit is 20 requests per minute. Exceeding this rate limit will result in an Error: Failed to load message in the embedded app. After the minute has refreshed, app loading will resume as normal.
If you require a higher rate limit, or would like to upgrade to a "soft" limit that will still allow app loads, please contact [email protected].
Implement iframe configuration for signed embedding
Configure the iframe
After implementing the createPresignedUrl API in your web application, you'll need to properly configure an iframe to display your embedded Hex app. The iframe requires specific attributes to embed properly.
<iframe
  width="1000"
  height="1000"
  style="border: none;"
  src="${urlFromApiResponse}"
  allow="clipboard-write"
></iframe>
Required iframe attributes
To ensure proper functionality and appearance, set the following attributes in your code:
src: The URL returned from yourcreatePresignedUrlAPI response. Remember that this URL is single-use and expires quickly, so you should request a new URL each time the page loads:allow="clipboard-write": Required to enable clipboard functionality within the embedded app.style="border: none;": Removes the default iframe border.widthandheight: Set the dimensions of your embedded app. You can use:- Fixed pixels (e.g., "1000")
- Percentage (e.g., "100%")
- Viewport units (e.g., "100vh")
Optimize app load time for signed embedding
We recommend following these best practices to ensure optimal performance for your embedded apps:
- Use SQL and no-code cells rather than Python cells
- Minimize the total number of cells
- Use the default Medium compute profile
- Use SQL caching and scheduled runs
Build your embedded project with SQL and no-code
Generally speaking, building your embedding project with Python or R will result in a longer app load time for your embed users. This is because the time it takes your code to run will be added to your users' app load time. Additionally, Hex has performance optimizations for non-code projects that will accelerate your app load time if you can build your project with only SQL and no-code Hex cells like charts and pivots.
Keep the total number of cells to a minimum
Larger projects generally take longer to run. If you find yourself with a very large project that has a high number of cells and tabs, you may notice a slower app load time.
Use a Medium compute profile
The default Medium compute profile is recommended for signed embedding. If you find yourself needing more memory for your signed embedding project, consider using pushdown to optimize memory capacity. Advanced compute profiles (Large compute profiles and above) are currently not available for signed embedding.
Use SQL caching and scheduled runs
We recommend using the default app run settings in the App builder, which enable Use SQL caching in published apps. This setting ensures your app uses the cached results of previous SQL queries to optimize app load time. You can optionally change how frequently your cache should be considered stale (we recommend daily). Then, set up a scheduled run to match this frequency.
With these project configurations, a user loading the embedded app will benefit from the SQL cache, which is kept fresh daily by your scheduled run.
Use dataframe SQL with SQL caching for performant row-level security
If you’re using hex_user_attributes to implement row-level security on warehouse data for your embedded app, we recommend adjusting this strategy slightly by leveraging our dataframe SQL in conjunction with SQL caching.
To implement this strategy, start by creating a data connection SQL cell base_data that queries the base data for all your embed users. Hex will cache the output of this SQL cell so that subsequent project runs do not need to re-run the query from scratch.
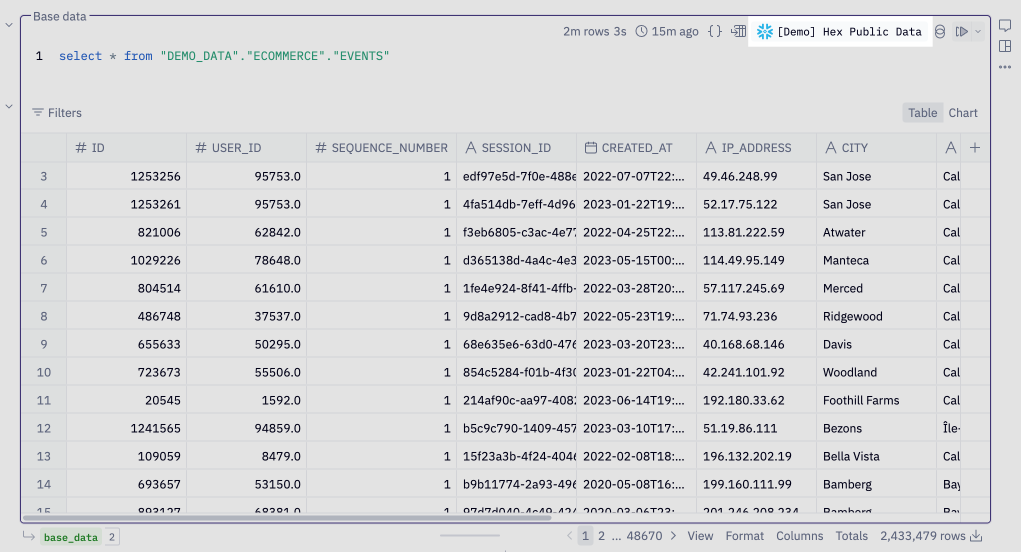
This base SQL cell should not be added to your app, as that would expose all data to all your embed users.
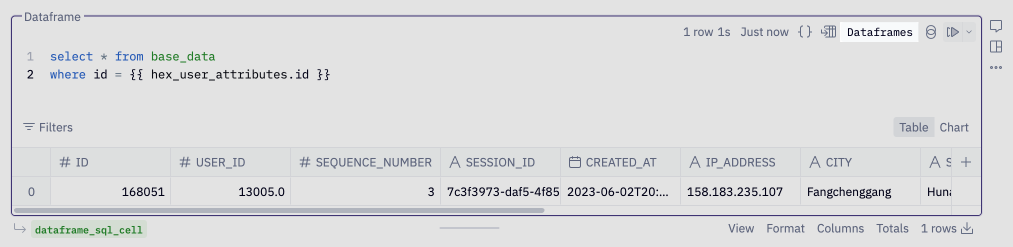
Then, create a dataframe SQL cell that queries the output of your first SQL cell, and filters the data using the hex_user_attributes variable in a where clause. By setting the data source to Dataframes, you are running this new SQL query against the cached output of your first SQL cell, rather than running as a CTE directly against your warehouse.
Finally, set up a scheduled run at your desired data freshness interval (we recommend daily). With these project configurations, when a user views your embedded app, the row-level SQL parameterization will run from scratch, but your project will be able to start from the SQL cache, which is kept fresh by your scheduled run.
If the results from your initial data connection SQL cell are too large to fit within your project’s memory limits, this strategy will not work for you. You will instead need to parameterize your initial data connection SQL query.
Apply custom branding to an embedded app
By default, signed embedding omits the typical Hex-branded header that appears on published apps in your workspace.
You can also use Hex's custom styling options, including font and background colors with custom app themes, to fully apply your own branding to your Hex embedded app.
Troubleshooting and Technical FAQ
Why is my embedded app not rendering in Hex?
- Published apps with
hex_user_attributesrequire the correct attributes to be passed via API in order to render. “Preview Values” only apply to the Notebook, App builder and Publish preview views. A published app with row-level security that is being used for embedding cannot also be viewed in Hex.
Why isn't my embedded app getting filtered correctly by values I passed in the API?
- Confirm that the
hex_user_attributesare specified in the Variables tab. Anyhex_user_attributesyou pass via API that are not specified in the Variables tab are ignored, even if your project references them.
What Hex functionality is not available on embedded apps?
- View/edit the notebook - no near term plans to support
- Comments - no near term plans to support
- Explore - no near plans to support
- Snapshots - no near term plans to support
Where can I view my Embed API usage?
- Admins can view their workspace's Embed API request usage from Settings > Billing summary > View Embed API breakdown.