OAuth data connections
Configure OAuth data connections to require users to authenticate into your data warehouse with user-specific credentials.
- Available on the Enterprise plan.
- Users need the Admin workspace role to configure OAuth data connections.
With OAuth data connections for Snowflake, Databricks, or BigQuery, users in your Hex workspace will be required to authenticate to your database using their own user-specific credentials, which generates an access token for each user. This allows for the enforcement of user-specific access controls for shared data connections.
You should only enable OAuth for a data connection if each Hex user who will have access to projects using that connection has their own user account configured in the respective platform (Snowflake, Databricks, or BigQuery).
If each Hex user does not have their own database credentials, an alternative to OAuth would be to configure one or more data connections to use a key pair or service principal (which associates the data connection with a single user). Then, share the data connections with whomever needs access.
Configure a workspace OAuth token
The first step to setting up an OAuth data connection in Hex requires creating the integration in your warehouse, and using the generated credentials to create a workspace OAuth token. The workspace OAuth token is required for testing the connection to the warehouse, and performing the initial fetch of the schema data. Additionally, successful creation of a workspace OAuth token confirms that the OAuth integration has been set up correctly.
Snowflake OAuth Setup
-
Create the security integration in Snowflake
A Snowflake Account Admin must run the following SQL snippet in Snowflake and retrieve theCLIENT_IDandCLIENT_SECRET.USE ROLE ACCOUNTADMIN;CREATE SECURITY INTEGRATION OAUTH_HEXTYPE=OAUTHENABLED=TRUEOAUTH_CLIENT = CUSTOMOAUTH_CLIENT_TYPE='CONFIDENTIAL'OAUTH_REDIRECT_URI='https://app.hex.tech/snowflake-oauth-success'OAUTH_ISSUE_REFRESH_TOKENS = TRUEOAUTH_REFRESH_TOKEN_VALIDITY = 7776000OAUTH_ENFORCE_PKCE = TRUE;select system$show_oauth_client_secrets('OAUTH_HEX');Additionally, you can allow default secondary roles to be set in OAuth sessions with:
OAUTH_USE_SECONDARY_ROLES = IMPLICITNote that
OAUTH_REFRESH_TOKEN_VALIDITYis set to 90 days here; this value can be modified if you want to require users to reauthenticate at a different interval.If your Hex workspace is not hosted at
app.hex.tech, then you must update that section of theOAUTH_REDIRECT_URIaccordingly.Additionally, the name of the
SECURITY INTEGRATIONin the first and last lines of the above query, must be the same (in this example both areOAUTH_HEX).For more details, refer to Snowflake’s OAuth Documentation:
-
Create the connection in Hex
Once the Snowflake security integration is set up, a Hex Admin can navigate to Workspace Settings → Data sources, then locate the Snowflake OAuth Connections section, and click + Connection. -
Complete the connection setup
Enter the Client ID and Client Secret generated in step 1. Follow the prompts to authenticate—you will be redirected to the Snowflake login screen. Once authenticated, the integration set-up will be complete.
When authenticating with Snowflake, make sure to use an account that does not have one of the following as the default Snowflake role: ACCOUNTADMIN, SECURITYADMIN, ORGADMIN. Snowflake blocks these roles from being used with security integrations like OAuth. See Snowflake's documentation for more detail.
Databricks OAuth Setup
-
Create a custom OAuth application in Databricks
A Databricks Admin must enable a custom OAuth application and generate aCLIENT_IDandCLIENT_SECRETfor the OAuth integration. Refer to the steps outlined in Databricks OAuth Documentation for detailed instructions. The allowed Redirect URL in the connection should behttps://app.hex.tech/databricks-oauth-successfor multi-tenant workspaces, andhttps://<YOUR-HEX-DOMAIN-NAME>/databricks-oauth-successfor single-tenant, EU, or HIPAA deployments. -
Create the connection in Hex
Once the Databricks OAuth application is set up in Databricks, a Hex Admin can navigate to Workspace Settings → Data sources, locate the Databricks OAuth Connections section, and click + Connection. -
Complete the setup
Provide a connection name and host in the format ofhttps://<your-databricks-instance>.cloud.databricks.com, and enter the Client ID and Client Secret generated in Databricks. When you select "Add connection", you will be redirected to the Databricks login screen. Once authenticated, the connection setup will be complete.
BigQuery OAuth Setup
-
Create an OAuth client in BigQuery
A Google Cloud admin must configure an OAuth client within the Google Cloud Console and retrieve theCLIENT_IDandCLIENT_SECRET. In the Google Cloud console, select APIs & Services from the menu on the left, and then select Credentials. On this page, Select + Create credentials, OAuth client ID, and choose "Web application" as the Application type. Add an Authorized redirect URI for your Hex workspace—https://app.hex.tech/bigquery-oauth-successfor multi-tenant, andhttps://<YOUR-HEX-DOMAIN-NAME>/bigquery-oauth-successfor single-tenant, EU, or HIPAA deployments.For more details, review the Google Cloud OAuth Documentation.
-
Connect to Hex
Once the BigQuery OAuth client is set up, a Hex Admin can navigate to Workspace Settings → Data sources, locate the BigQuery OAuth Connections section, and click + Connection. -
Complete the setup
Enter the Client ID and Client Secret generated in the Google Cloud console, and follow the prompts to authenticate. You will be redirected to the BigQuery login screen. Once authenticated, the connection setup will be complete.
Set a data connection to use OAuth
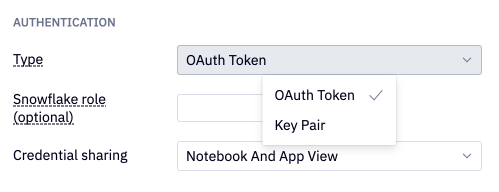
Once the integration is established for Snowflake, Databricks, or BigQuery, you can configure data connections to use OAuth by editing the connection and setting the Authentication Type as OAuth Token.
Snowflake roles
For Snowflake data connections using OAuth for authentication, you can also set a Snowflake role to restrict usage of the data connection to only use that role. Therefore, only users who are authorized to assume that role in Snowflake will be able to use that data connection. Note that Snowflake roles are case-sensitive, so make sure to check that the role specified here matches exactly.
The current role assigned to any Snowflake OAuth data connection in a Hex project can be found in the data connection details menu in the Data sources tab of the left sidebar. For OAuth connections that do not have a role set in Workspace settings, users can switch the role being used for the OAuth data connection by using the Switch Snowflake role... menu option. Users can choose from any of the OAuth roles with which they’ve already authenticated or authenticate with a new role.
Creating a service account for Snowflake OAuth Connections
Admins can connect to the warehouse with a service account that will be used for schema refreshes. Running schema refreshes with a properly scoped service account can ensure consistency across schema refreshes and that the appropriate amount of schema data is pulled into Hex. When you do not connect with a service account, schema data reflects the permissions of the user who last ran a schema refresh for all users.
Service accounts are required when applying OAuth permissions to schema data for Snowflake connections
A Snowflake admin needs to take the following steps to configure the service account:
- Create a new user for the service account
- Assign appropriate roles to the service account
tip
This service account should be set up in Snowflake with view permissions on all parts of the schema you want synced to Hex. Depending on how roles are configured at Snowflake, this may be covered by giving the service account access to all of the existing roles. However, if that’s not the case then an admin may have to create additional roles for comprehensive coverage.
- Create a key-pair for authentication
For more detailed information on Snowflake access control reference their documentation.
Credential sharing
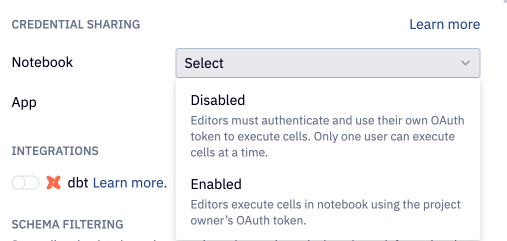
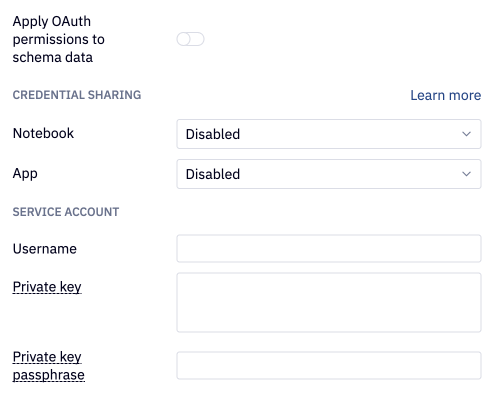
Decide on how you want to handle OAuth credential sharing in Hex projects via the Credential sharing dropdown menu. Credential sharing settings can be configured separately for both the notebook and the app view.
- Enabled
- Disabled
This setting determines whether users editing or viewing a project use the project owner's OAuth token or if they must authenticate with their own credentials.
Notebook View
When credential sharing is enabled in the Notebook view, OAuth connections function similarly to username or key pair connections, allowing multiple users to have "Can edit" access to the project. All users with access to the Notebook can execute cells using the project owner's OAuth token. If the owner's OAuth token expires, the owner must re-authenticate to the warehouse to refresh their token, allowing all users to continue working in the project.
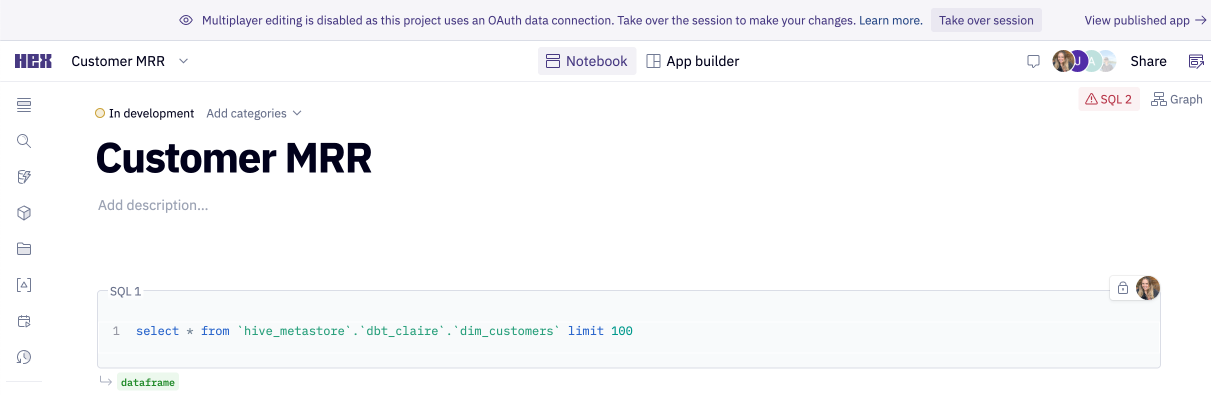
When credential sharing is disabled in the Notebook view, multiplayer editing is disabled and only one editor can be active in the Notebook at a time. Other users with "Can Edit" permissions on the project can Take over session from the banner at the top of the project to start editing. Taking over the session restarts the kernel so that the new user's OAuth token is used to run queries, and the original editor’s results cannot be accessed. When one editor is active in the Notebook, others with "Can explore" permission will not see cell outputs.
When sharing a project with our support team via ? -> Share with support, the support user inherits the project owner’s OAuth credentials, regardless of the credential sharing settings. This allows our support team to continue providing the best possible support to your Hex users, while keeping all access controls centralized and fully visible in your Snowflake account. Hex's support team will use these credentials strictly for providing support to your Hex users upon request.
All of this is visible from the notebook view if there are OAuth data connections being used. Editors can easily see if credential sharing is enabled or disabled, and which connections in the notebook are using OAuth.
Published App View
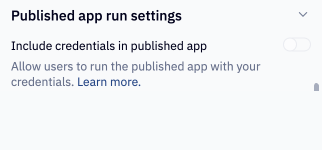
When publishing an app, if App credential sharing is enabled, the project publisher can choose whether the app runs with the publisher’s credentials or requires each viewer to authenticate to the warehouse. This choice appears in Published app → Run settings during the publish flow and can be changed on every republish. The default is Off (do not include publisher credentials).
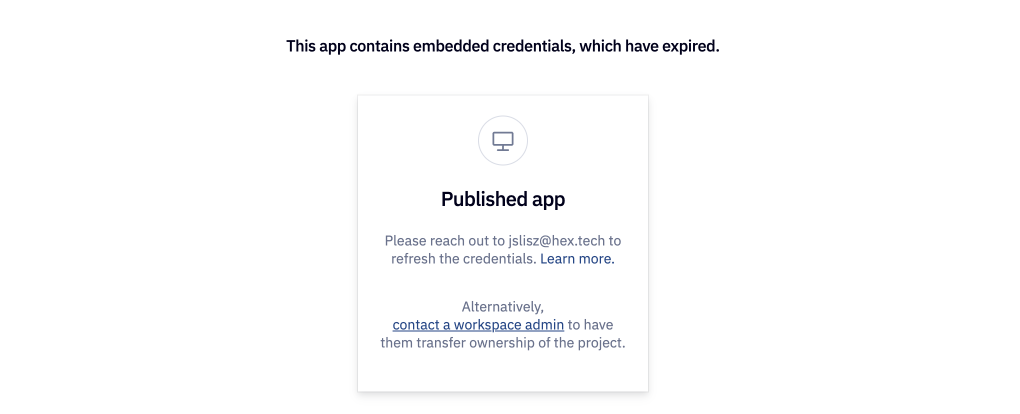
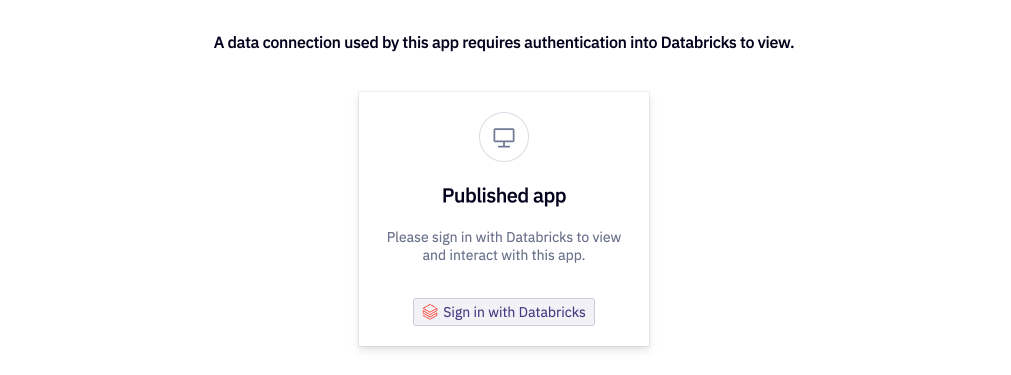
If the publisher’s credentials are shared, app users can view and run the project without authenticating with Snowflake. In this case, app runs will use the publisher’s credentials. If the publisher's OAuth token has expired, users will see an error page prompting them to contact the publisher.
If credential sharing is disabled in the published app, all app viewers are required to authenticate to the warehouse and use their own token to run the app. If they don't have an active token, they'll be prompted to authenticate when opening the app.
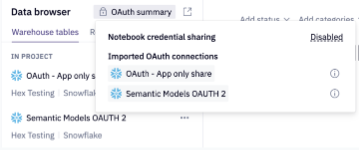
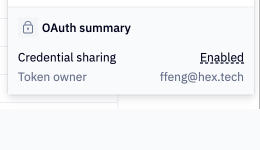
App viewers can also easily see an OAuth summary of the app - if credential sharing is enabled or disabled, and if it is enabled, whose token is in use.
Applying OAuth permissions to schema data
For Snowflake data connections using OAuth for authentication, you can also choose to apply those OAuth permissions to schema data. This means that a Hex user in the Data browser can only view schemas that they have access to.
In order to do so, Admins must both toggle on “Apply OAuth permissions to schema data” and configure a service account. This service account should be set up in Snowflake with view permissions on all parts of the schema you want synced to Hex. “All parts” meaning databases, schemas, tables and columns. In terms of permission, it should be USAGE or higher. Hex then uses the bounds of the schema in this service account to then apply per-user permissions to the schema data in the data browser and other places.
If a user has multiple roles in Snowflake, they will be able to leverage the collective privileges granted by primary and secondary roles which are visible in the data browser in Hex. Query access will depend what role the user has authenticated into.
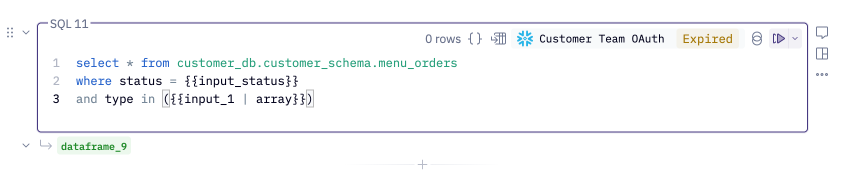
Tokens and expiration
If a project Editor attempts to run a query against an OAuth Connection after the token has expired, or if they have never authenticated, Hex will display an "Expired" header on the SQL cell and prompt the user to authenticate.
For published apps with credential sharing disabled, App Viewers will similarly be prompted to authenticate when they attempt to run a project containing queries against an OAuth connection.
Users can review their existing tokens in Settings > Connected Apps, which includes data on when their tokens were last generated and when they expire. It is also possible to refresh and revoke tokens from this page. Depending on the users notification preferences, they will receive an email and/or a Slack notification 24 hours prior to their OAuth token expiring to refresh their tokens.
Scheduled runs & caching
Scheduled runs
Scheduled runs for projects which use OAuth data connections have some limitations depending on whether credential sharing is enabled for the project. When credential sharing is disabled for the published app, scheduled runs can only be scheduled by the project owner. Additionally, scheduled run notifications will not include screenshots. If credential sharing is enabled for the published app, the project owner's token will be used to execute the project run and a screenshot of the resulting app can be included in scheduled run notifications.
Published app caching
If a project has credential sharing disabled for the published app, then the published app results will be cached per user, rather than shared between all users of the app. This prevents project outputs that were generated by a user with more liberal permissions being visible to lower-permission users in the published app.
By default, first time a user visits an app (or visits an app after a new version has been published):
- The app will run in front of the user in the current session.
- Additionally, a run in the background will be kicked off to populate the cached state for the user.
The next time a user visits the app, they will see the results generated from the latter run.
This behavior can be changed by changing the app's run settings.
Query caching
Hex stores a cache for query results specific to each access token. If credential sharing is enabled, query caching will function like any other data connection, where results are pulled from the cache instead of running in your warehouse within the timeout window.
When credential sharing is disabled, caching settings will be applied on the user-level, specific to each token. If one user were to run an app multiple times within the caching timeout window, the query results of subsequent runs would be pulled from cache. If another user were to visit the app within this timeout window, the first app run would execute queries in the warehouse using their Snowflake credentials.
Known limitations
There are several known limitations to be aware of when using OAuth data connections.
-
Data browser — Due to the current design behind Hex's Data browser, there is a possibility that a Hex user with more restrictive permissions may be able to see schemas they do not have access to. In particular, if a user views the Data browser after another user with higher permissions has refreshed the Data browser, all schemas and tables will be visible to that user. However, the data in those schemas and tables will not be visible or queryable by the user with restricted permissions. Admins can also configure a service account and refresh schemas using those credentials instead to ensure a consistent experience in the data browser for all users.
For Snowflake data connections using OAuth for authentication, you can choose to apply those OAuth permissions to schema data.
-
Notion embedded project previews — Due to how Notion embeds work it is possible that if a user embeds a project using a restricted Snowflake OAuth connection that anyone who visits the Notion page will be able to view the results of that project. See full details about Notion embed permissions here.
-
Using Magic with OAuth data connections - Magic does not respect user level permissions for schemas on OAuth data connections, but will respect OAuth permissions on the underlying data. Magic requests will reference the data that the service account has access to, meaning it may return a query that references a table the user does not have access to. If Magic returns a query that includes a table that the user does not have access to, the query will error and not return results. For highly sensitive schemas that you would like to use with Magic, we'd recommend creating a private data connection.
-
Importing OAuth connections - For projects where Notebook credential sharing is enabled, importing OAuth connections is restricted to the Project Owner. Editors will need the owner to add the connection (or transfer ownership) before they can use it.
Troubleshooting and FAQ
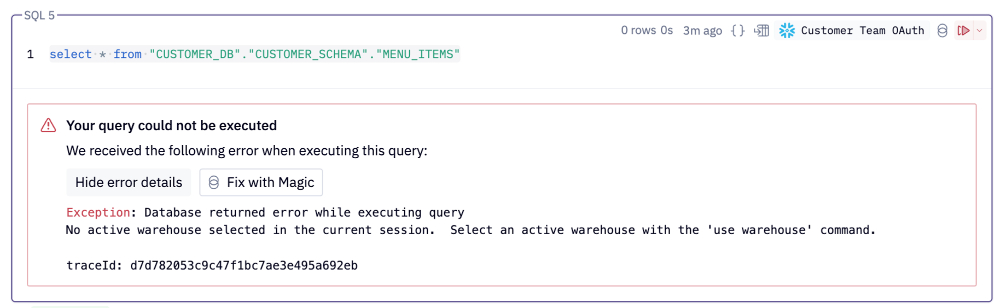
No active warehouse error
When an Admin configures a Snowflake connection, they can define a warehouse as part of that connection. If they choose to do so, all users that authenticate into Snowflake will need to have access to that warehouse.
If a Hex user is seeing an error like the following when executing SQL, their current Snowflake role does not have access to the warehouse that has been defined as part of the connection.
Optionally, Admins can also leave the warehouse field blank in the Snowflake connection. However, in that case, all their users must be assigned default warehouses in Snowflake. If the user does not have a default warehouse assigned in Snowflake, they will also see the same error.
To fix this error when a user does not have access to the default warehouse in the data connection:
- Check which role the Hex user is current using by having them run a
select current_role()statement. - Confirm which role is defined as part of the Snowflake connection in the Data Sources page of Settings.
- Have a Snowflake admin grant the user's role access to the warehouse (Snowflake docs).
To fix this error when the user does not have a default warehouse assigned to them:
- As a Snowflake user, you can set your own warehouse:
- First run
select current_userif you're unsure if your username - Then run
describe <my_user>(e.g.describe helly_r) to check if a default warehouse has been set - If not, run
alter user <my_user> set default_warehouse <my_warehouse>, e.g.alter user helly_r set default_warehouse refining.
- First run
- Ask a Snowflake admin to alter the user to have a default warehouse (Snowflake docs). Consider setting default warehouses for all users so that each user does not need to manage this themselves.
Note that using use warehouse statements within a project will not solve this issue since each SQL cell is a separate session in Snowflake (to allow parallel execution of queries).
Expired app credentials
When app credential sharing is enabled, the project owner's credentials are used to run the published apps. A Snowflake OAuth token expires after a set number of days (based on how the integration was configured in Snowflake).
This can lead to a case where the project owner's credentials have not been refreshed recently and the published app is no longer working.
When this happens, Hex will prompt you to contact the project owner to have them refresh their credentials. If this person is unavailable (for example, they are out of office), you can also ask a workspace admin to transfer ownership of the project so that a different user's credentials are used in the published app.