Environment views
Manage your project environment from the Environment, Files, and Variables sidebars.
Environment
You can adjust your project's compute profile, cell execution settings, and more from the Environment sidebar.
Compute profile
Image
By default, projects use Python 3.11. You can change which version of Python the project uses via the Image dropdown.
If your organization uses custom images, you can use the same dropdown to select a custom image to be used in your projects.
Hex's Python 3.11 image supports pandas==2.2.3 and numpy==2.1.0, while also reducing the overall image size and number of pre-installed packages.
If you are missing an expected package, you may need to !uv pip install it in your notebook, or change your Image to Python 3.10 or 3.9 -- only 3.11 will be fully patched with the latest fixes for security vulnerabilities in third-party packages.
Size
Compute profile size determines the CPU, GPU, and memory limits for your project kernels. You can adjust compute profile size to meet the needs of your project.
| Size | Memory (GB) | CPUs | Availability |
|---|---|---|---|
| Extra Small | 2 | 0.25 | Included |
| Small | 4 | 0.5 | Included |
| Medium (default) | 8 | 1 | Included |
| Large | 16 | 2 | Pay-as-you-go |
| Extra Large | 32 | 4 | Pay-as-you-go |
| 2XL | 64 | 8 | Pay-as-you-go |
| 4XL | 128 | 16 | Pay-as-you-go |
| L4 GPU | 27 | 6 | Pay-as-you-go |
| A10G GPU | 27 | 6 | Pay-as-you-go |
- All paid plans include up to Medium compute.
- Large+ compute is available pay-as-you-go on Team and Enterprise plans.
When should I use a larger compute profile?
Larger compute profiles are primarily used for data science workflows, like model training, that bring large datasets in-memory (>8GB) and/or require more computational power. There are two primary use cases for larger compute profiles:
-
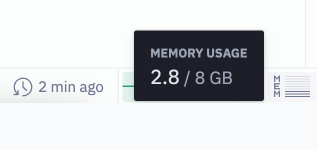
High memory requirements: If you're working with more than 8GB of data, you may choose a larger compute profile size to increase your project memory. However, note that Hex supports both SQL pushdown with Query mode and Python pushdown with Snowpark, which are typically the best solutions for memory constraints alone. Learn more about managing memory in Hex.
-
Code threading: If you're writing computationally-expensive Python code, you may choose a compute profile with more CPUs and/or GPUs, in order to implement code threading or parallel processing. This is a common technique to speed iteration cycles in ML model training workflows.
What happens when I update my compute profile size?
When you update your project's compute profile size, you will need to either run your project or restart your kernel to apply the changes. Kernels powering published App sessions and scheduled runs will not be updated until you publish your changes. Note that anonymous users (i.e. users without a Hex account) who view a publicly-shared App will always be limited to Small compute, regardless of the underlying project's compute profile.
Larger compute profiles require a longer kernel startup time before the project begins running. Kernel startup time does not contribute to your compute usage for usage-based billing.
Notebook idle timeout
The idle timeout setting dictates how long your notebook kernel will stay alive after it becomes idle. A kernel is considered idle when no cells are running. The default idle timeout is 1 hour, but can be decreased (e.g. to manage costs when using advanced compute profiles), or increased (e.g. to ensure Python state is preserved if you need to step away during a long-running job).
Idle timeouts >5 hours are available only on advanced compute profiles.
Cell execution order
Hex uses a project’s DAG to understand dependencies between cells. Instead of running cells linearly according to the notebook ordering, Hex can leverage this dependency graph to perform various runtime optimizations such as parallelizing independent cells and ignoring hidden cells (when in app view).
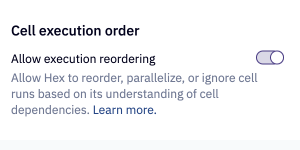
From the Environment sidebar, use the Cell execution order toggle to determine whether the project should run with performance optimization (toggle on) or run linearly (toggle off). Leaving the toggle ON is recommended for the vast majority of cases - when in doubt, leave it alone!
In rare circumstances where Hex is not able to intuit a dependency between python cells, the toggle can be turned OFF to force linear ordering based on the notebook cell order.
Files
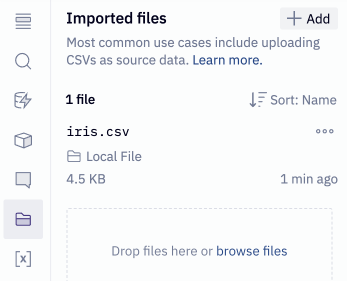
From the Files sidebar in your Hex project, you can upload files including CSV and JSON files.
Variables
From the Variables sidebar in your Hex project, you can add project secrets and environment variables, as well as reference built-in variables and any variables defined in your code.
Secrets
Keep your sensitive values, like API tokens or passwords, secret by adding them as Secrets. We store all Secrets in a highly-encrypted vault, which is only visible to other users with "Full Access" or "Can Edit" project permissions. Secrets can be referenced in Python cells, but an attempt to display them in the Notebook view or App builder will return [SECRET VALUE] .
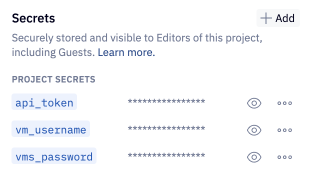
You can add a Secret to a project by clicking the +Add button in the Secrets tab of the left sidebar. If you want to use a Secret which is defined as a shareable, workspace Secret, choose Import workspace secret from the menu to be presented with Secrets which are available for import. If you want to create a Secret for use only in the given project select Create project secret.
To access your Secrets, call them directly in place of where you would hard-code your credentials. In the example below, we're setting up a Snowflake connection and passing the database details as Secrets.

Environment variables
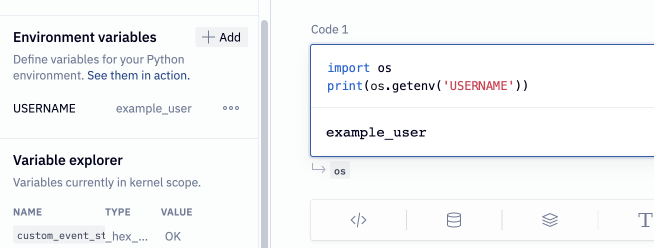
You can configure environment variables to be used in your projects. Environment variables aren't kept in the encrypted vault, nor are they redacted. Setting an environment variable in the left side panel is equivalent to using the python os library directly in your logic.
See more documentation for the os library here.
Built-in variables
We also have some variables which are automatically included in your project. These variables can be referenced in any cell.
| Variable | Value | Description |
|---|---|---|
| hex_scheduled | False/True | If the run is being executed as part of a scheduled run, this variable is set to True. If the run is executed in any other context, the variable is set to False. |
| hex_user_email | If a user is logged in and viewing a published app, this variable is equal to the email address associated with their user account. Helpful if you want to customize what a given user sees in the app. Check out our Tutorials page for an example. | |
| hex_run_context | "logic", "app", "scheduled", "api-triggered", "publish-preview", "app-refresh" | Describes the context that the project is being run in. Helpful if you want to restrict certain logic to only run in particular run contexts. For example, use this if you have some debug code that you want to run in the logic, but don't want to run while a user is interacting with the published app. |
| hex_timezone | "America/Los_Angeles", "Australia/Sydney", etc. | The timezone selected for the project. By default this is the workspace timezone, but can also be overridden at the project level, as well as for specific app sessions. See Chart cell timezones for more information. |
| hex_project_id | Project ID i.e. 1f0cfa16-cea1-428a-b950-e56379f2fdac | A unique project identifier found in the Project's URL |
| hex_project_name | Project Name i.e. "Weekly Metrics" | Name given to the project |
| hex_status | "In Progress", "Approved", "Archive", etc. | Status the project is tagged with. Admins can configure custom statuses in the Organization section of workspace settings. |
| hex_categories | ["Q2 projects", "Analytics", etc.] | Category or categories the project is tagged with. Admins can configure custom categories in the Organization section of workspace settings. |
| hex_color_palette | ['#4C78A8', '#F58518', '#E45756', ... ] | An array of CSS color codes that map to the currently active workspace color palette. Using this variable can help create consistently themed visualizations when using both the native Chart cell and visualizations created via Python packages. |
Mute cells
If there are cells in your project that you only want to execute in specific contexts (e.g. on project runs in Notebook view, only during scheduled runs, etc.), you can do so using the built-in hex_run_context and hex_scheduled variables. With these variables, you can check the context for when each cell is run and execute the desired logic accordingly. See the below code snippets for some examples code!
if hex_run_context == 'logic':
    ## Something that only needs to happen during a Notebook run
else:
    ## otherwise this cell will be muted
Similarly, you can do the same in an SQL cell via Jinja.
{% if hex_run_context == 'logic' %}
    -- Something that only needs to happen during a Notebook run

{% endif %}
Variable explorer
The Variable explorer allows you to browse the variables generated by your code. For each variable, we show you its name, type, and value.